


The Complete Guide to permanent christmas light installation
Tired of the yearly struggle with tangled strings and wobbly ladders? Imagine a world where your home is always ready for the holidays, or any celebration, with just a few taps on your phone. Permanent christmas light installation offers a smart, safe, and simple way to light up your home year-round. These lights stay put, saving you time and effort, and they’re built to last through all kinds of weather. Plus, with modern LED technology, they’re easy on your electricity bill. This guide will walk you through everything you need to know about getting these amazing lights set up, from planning to picking the right ones, and even how to keep them looking great for years.
Key Takeaways
- Permanent christmas light installation means you don’t have to hang lights every year, saving you time and effort.
- These lights use LED technology, which means they use less energy and can save you money on your electricity bill over time.
- You can change the colors and patterns of permanent christmas lights, making them perfect for any holiday or special event, not just Christmas.
- They are built to handle tough weather, so you don’t have to worry about them breaking down in rain or snow.
- Having permanent christmas lights can make your home look nicer and might even add to its value.
- Planning your light layout and picking the right type of lights are important steps before you start installing.
- Safety is a big deal during permanent Christmas light installation, especially when dealing with electricity and working at heights.
- Regular cleaning and checking your lights will help them last longer and keep working well.
Understanding Permanent Christmas Light Installation
Defining Permanent Christmas Lighting
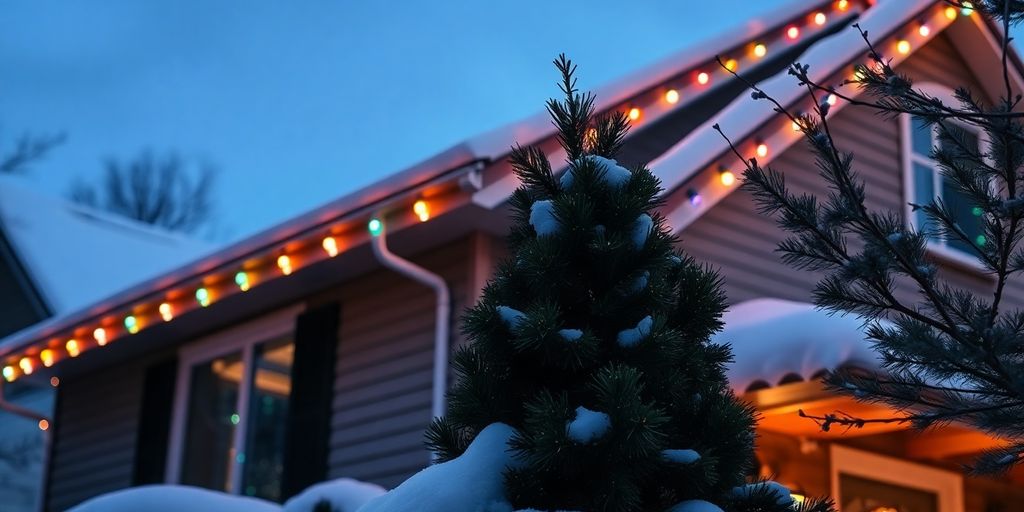
Permanent Christmas light installation is a long-term lighting solution that stays put all year. Unlike traditional lights, you don’t have to put them up and take them down every season. These lights are built to last, using tough materials that can handle all kinds of weather. Plus, with LED tech, you can change the colors and patterns whenever you want, making them perfect for any holiday or event. Think of it as investing in a lighting system that’s always ready to go, whether it’s for Christmas, the 4th of July, or just to add some flair to your home.
Advantages Over Traditional Lighting
Traditional Christmas light installation can be a real pain. You have to drag out the ladder, untangle the lights, and hope they all still work. Permanent holiday lights skip all that hassle. Here’s a quick comparison:
| Feature | Traditional Lights | Permanent Lights |
|---|---|---|
| Installation | Annual | One-time |
| Maintenance | Frequent | Minimal |
| Storage | Required | Not Required |
| Energy Use | Higher | Lower |
| Customization | Limited | Extensive |
Year-Round Aesthetic Appeal
One of the best things about permanent holiday lighting is that you’re not stuck with just Christmas colors. You can switch them up for any occasion. Want red, white, and blue for the 4th of July lights? Done. Spooky orange and purple for Halloween? Easy. You can even use them to highlight architectural features or create a nice ambiance for outdoor gatherings. It’s like having custom lighting at your fingertips all the time.
Energy Efficiency with LED Technology
LED lights are a game-changer when it comes to energy use. They use way less electricity than old-school incandescent bulbs, which means lower energy bills. Plus, they last a lot longer, so you won’t have to replace them as often. This not only saves you money but also reduces waste, making them a more eco-friendly choice. For example, switching to LED permanent Christmas lights can cut your energy consumption by up to 75% compared to traditional lights.
Customization Options for Every Occasion
With permanent Christmas lights, you’re not limited to just a few basic settings. You can create custom color palettes, set up dynamic lighting patterns, and even schedule different themes for different times of the year. Many systems come with app control, so you can adjust everything from your smartphone. Imagine being able to change your lights to match your favorite sports team’s colors on game day or create a festive display for a birthday party with just a few taps on your phone.
Durability in All Weather Conditions
These lights are designed to withstand the elements. They’re made with weather-resistant materials that can handle rain, snow, heat, and wind. This means you don’t have to worry about them getting damaged or needing to be replaced every year. Look for lights that are specifically rated for outdoor use and have a good warranty to protect your investment.
Seamless Integration with Home Architecture
Permanent Christmas lights can be installed in a way that blends in with your home’s design. You can hide the wiring and mounting hardware so that the lights look like they’re a natural part of your house. This creates a clean, professional look that enhances your home’s curb appeal. Plus, you can choose from different styles and colors to match your home’s aesthetic.
Long-Term Value and Investment
Investing in permanent holiday lights is a smart move for homeowners. While the initial cost might be higher than traditional lights, the long-term savings and added convenience make it worth it. You’ll save money on energy bills, replacement lights, and installation costs. Plus, you’ll add value to your property and enjoy a beautiful lighting display all year round.
Key Benefits of Permanent Christmas Light Installation
Significant Cost Savings Over Time
Okay, so, yeah, permanent Christmas lights cost more upfront. I get it. But think about it this way: you buy them once. No more yearly trips to Target for new strands that inevitably have a section that’s already burned out. Plus, you’re not paying someone to hang them up and take them down every year. That adds up! And with LEDs, the energy bill is way lower than those old-school incandescent bulbs. It’s a long-term win, trust me.
Enhanced Safety for Homeowners
Let’s be real, hanging Christmas lights is kinda dangerous. I mean, ladders? Slippery roofs? No thanks. With permanent lights, you install them once, and you’re done. No more risking a fall every December. That’s a huge relief, especially as I get older. I’m all about avoiding unnecessary trips to the ER.
Eliminating Annual Setup and Takedown
Seriously, who actually enjoys putting up and taking down Christmas lights? It’s a chore. It’s time-consuming. And it’s usually freezing cold when you’re doing it. Permanent lights mean you can ditch that whole process. More time for hot cocoa and watching holiday movies, less time untangling wires in the attic.
Reducing Storage Needs for Lights
Where do you even put all those Christmas lights the rest of the year? They take up so much space! And they always seem to get tangled no matter how carefully you pack them away. Permanent lights solve that problem completely. No more bins of tangled lights cluttering up your garage or attic. It’s a small thing, but it makes a big difference.
Increased Property Value and Curb Appeal
Okay, this might sound a little superficial, but hear me out. A house with nice lighting just looks better. It makes your home more inviting and can even increase its value. Permanent Christmas lights let you customize your lighting for any occasion, making your house the envy of the neighborhood, all year round. Plus, it’s a nice touch if you ever decide to sell.
Environmental Benefits of LED Lights
LEDs are way more energy-efficient than traditional Christmas lights. They use less electricity, which means a smaller carbon footprint. Plus, because they last so much longer, you’re not throwing away burned-out bulbs every year. It’s a small way to be a little more eco-friendly during the holidays (and all year long!).
Convenience and Ease of Use
With smart controls, you can turn your lights on and off, change colors, and set schedules all from your phone. No more fumbling with timers or extension cords. It’s just so easy and convenient. I can even change the lights to match the team colors when we have people over to watch the game. Pretty cool, right?
Versatility for Various Celebrations
These lights aren’t just for Christmas! You can use them for Halloween, birthdays, Fourth of July, or just to add some ambiance to your backyard patio. With customizable colors and patterns, you can create the perfect lighting for any occasion. It’s like having a built-in party atmosphere, ready to go whenever you need it.
Permanent Christmas lights are a game-changer. They save you time, money, and hassle, while also making your home look great all year round. It’s an investment that pays off in so many ways.
Planning Your Permanent Christmas Light Installation
Okay, so you’re thinking about getting permanent Christmas lights installed? Awesome! But before you just start slapping lights up, you need a plan. It’s like any home improvement project – a little prep work goes a long way. Trust me, winging it with electrical stuff is never a good idea. Let’s get into the nitty-gritty of planning.
Defining Your Lighting Goals
First things first: what do you actually want to achieve with these lights? Are you aiming for a subtle, year-round glow that highlights your home’s architecture? Or are you dreaming of a full-blown, color-changing extravaganza that can be customized for every holiday and event? Knowing your goals will guide every decision you make. Think about the overall vibe you’re going for. Do you want something classic and elegant, or something fun and festive?
Mapping Out the Ideal Layout
Grab a notepad and head outside. Seriously, walk around your property and really look at it. Where do you want the lights to go? Along the roofline? Around windows? Highlighting landscaping features? Think about the architectural details you want to accentuate. A well-thought-out layout is key to a professional-looking result. Consider things like:
- The shape of your roof and how the lights will follow it.
- The placement of windows and doors.
- Any trees or bushes you want to incorporate into the design.
Choosing the Right Lighting Type
Not all permanent Christmas lights are created equal. You’ve got your standard LED string lights, but there are also options like individual puck lights, strip lights, and even programmable RGB lights that can display millions of colors. The type of light you choose will depend on your budget, your desired aesthetic, and the features you want. Do some research and compare different options before making a decision.
Considering Architectural Features
Your home’s architecture should play a big role in your lighting plan. A modern home might look great with sleek, minimalist lighting, while a Victorian-style home might benefit from more ornate and decorative lights. Think about how the lights will complement the existing features of your home, not compete with them. Consider the color of your siding, the style of your windows, and the overall design of your house.
Measuring for Accurate Light Placement
This is where the measuring tape comes in. Once you’ve mapped out your layout, you need to measure the length of each section where you’ll be installing lights. This will help you determine how many lights you need and ensure that you don’t come up short. Measure twice, cut once, as they say! Don’t forget to account for any curves or angles in your roofline.
Sketching Your Design Vision
Okay, time to get artistic (sort of). Take your measurements and your layout ideas and create a sketch of your lighting design. This doesn’t have to be a masterpiece, but it should give you a visual representation of what you’re trying to achieve. Include details like the type of lights you’ll be using, the colors you want to display, and any special effects you’re planning. It’s a great way to visualize the final product and make sure everything looks good on paper before you start installing.
Assessing Power Source Locations
Lights need power, right? So, before you get too far into your planning, figure out where you’re going to plug everything in. Do you have outdoor outlets readily available? If not, you might need to install some, which could add to the cost of your project. Also, think about how you’re going to run the power cords. You don’t want them dangling all over the place, so you’ll need to find a way to conceal them. Extension cords rated for outdoor use are a must.
Budgeting for Materials and Labor
Let’s talk money. Permanent Christmas lights can be a significant investment, so it’s important to set a budget and stick to it. Get quotes from different suppliers and installers (if you’re not doing it yourself) and compare prices. Don’t forget to factor in the cost of materials like lights, mounting hardware, power cords, and any tools you might need to buy. And if you’re hiring a professional, be sure to get a detailed estimate that includes labor costs.
Planning is the most important step. A little time spent planning can save you a lot of headaches (and money) down the road. Take your time, do your research, and don’t be afraid to ask for help if you need it. You’ll be enjoying your beautiful, permanent Christmas lights for years to come!
Selecting the Best Permanent Christmas Lights
Evaluating LED Light Quality
When you’re looking at permanent Christmas lights, the LEDs are super important. You want lights that are bright and consistent. Look for LEDs with a good reputation for longevity. Cheaper LEDs might fade or change color over time, which is a pain. Also, check the IP rating – this tells you how well the lights are protected from water and dust. Higher IP ratings mean better protection, which is what you want for outdoor lights that will be up all year round.
Understanding Color and Brightness Options
Think about what colors you want your lights to display. Some lights only do a single color, while others can display millions. If you want to be able to change the colors for different holidays or events, go for the ones with more options. Brightness is also key. You don’t want lights that are so dim you can barely see them, but you also don’t want them so bright they bother your neighbors. Look for lights that let you adjust the brightness.
Choosing Weather-Resistant Materials
Since these lights are going to be up year-round, you need to make sure they can handle the weather. Look for lights made from durable materials that won’t crack or fade in the sun. The connections should also be waterproof to prevent shorts. Pay attention to the temperature range the lights are rated for – you want them to work in both hot summers and cold winters. I’ve seen some lights get brittle and break after just one winter because they weren’t made for cold weather.
Exploring Smart Control Features
Smart control features can make your lights way more fun. Some lights come with an app that lets you change the colors, set schedules, and even create custom light shows. Some even work with voice assistants like Alexa or Google Home. This can be really handy if you want to turn your lights on or off without going outside. Just make sure the app is easy to use and has good reviews.
Comparing Different Light Brands
Do some research on different light brands before you buy. Read reviews and see what other people are saying about their experiences. Some brands are known for their quality and customer support, while others are known for being cheap but unreliable. It’s worth spending a little extra to get a brand you can trust. I usually check out a few different forums and see what people are recommending.
Considering Light Lifespan and Warranty
LED lights are supposed to last a long time, but not all lights are created equal. Check the manufacturer’s specifications for the expected lifespan of the lights. Also, look for a good warranty. A longer warranty means the manufacturer is confident in their product. If the lights fail within the warranty period, you can get them repaired or replaced for free. I always make sure to register my lights as soon as I get them so I don’t forget.
Assessing Energy Consumption
Even though LED lights are energy-efficient, it’s still a good idea to check their energy consumption. Look for lights with a low wattage rating. This will save you money on your electricity bill. Also, consider using a timer or smart controls to turn the lights off when you don’t need them. Every little bit helps!
Matching Lights to Home Style
Think about the style of your home when you’re choosing lights. If you have a modern home, you might want sleek, minimalist lights. If you have a more traditional home, you might want something more classic. Consider the color of your home’s exterior and choose lights that complement it. You want the lights to enhance your home’s appearance, not clash with it.
Choosing the right permanent Christmas lights is a big decision. It’s about finding the right balance of quality, features, and price. Take your time, do your research, and don’t be afraid to ask questions. With the right lights, you can enjoy beautiful, festive lighting all year round.
Essential Tools for Permanent Christmas Light Installation
Okay, so you’re ready to put up some permanent Christmas lights? Awesome! But before you start, you gotta make sure you have all the right tools. Trust me, nothing’s more annoying than getting halfway through a project and realizing you’re missing something simple. Here’s a rundown of what you’ll need.
Gathering Necessary Measuring Tools
First things first, you need to know how much lighting you need. A good measuring tape is your best friend here. Don’t just eyeball it; get accurate measurements of your roofline, gutters, or wherever you plan to install the lights. A laser distance measurer can also be super helpful, especially for those hard-to-reach spots. I find it easier to measure twice and cut once, as they say!
Selecting Appropriate Mounting Hardware
Choosing the right clips, screws, or fasteners is really important. You want something that’s going to hold up against the weather and keep your lights securely in place. Consider the surface you’re mounting to – wood, vinyl, or brick will all require different types of hardware. Stainless steel is usually a safe bet because it resists rust. I’ve had good luck with these:
- All-weather clips
- Self-tapping screws
- Adhesive mounts (for certain surfaces)
Ensuring Electrical Safety Equipment
Safety first, always! Working with electricity can be dangerous, so make sure you have the right safety gear. A circuit tester is a must-have to check if a wire is live before you start working on it. And definitely get yourself some insulated gloves. I also recommend wearing safety glasses to protect your eyes from any flying debris.
Choosing the Right Ladder for Heights
If you’re installing lights on a second story or higher, you’ll need a sturdy ladder. Make sure it’s tall enough to reach your highest point comfortably without overextending. An adjustable ladder is a great option because you can use it for different heights. And remember, always follow ladder safety guidelines – don’t lean too far, and have someone spot you if possible.
Preparing Wire Strippers and Crimpers
To connect your lights to the power source, you’ll need wire strippers and crimpers. These tools will help you strip the insulation off the wires and create secure connections. A good quality wire stripper will make the job much easier and prevent you from damaging the wires. I like to use crimpers that have different sized holes for different gauges of wire.
Having Drill and Fasteners Ready
A drill is essential for installing mounting hardware. A cordless drill with a variety of drill bits will give you the most flexibility. Make sure you have the right size drill bit for the screws or fasteners you’re using. And don’t forget to charge the battery before you start!
Utilizing Cable Management Solutions
To keep your installation looking neat and tidy, use cable management solutions. This could include:
- Zip ties
- Cable clips
- Conduit
These will help you hide the wires and prevent them from dangling or getting tangled. I like to use zip ties that are UV-resistant so they don’t break down in the sun.
Organizing Your Workspace Effectively
Before you start, take some time to organize your workspace. This will make the installation process much smoother and prevent you from losing tools or materials. A tool belt or tool bag can be really helpful for keeping everything within reach. And don’t forget to have a trash can nearby for disposing of any scraps or waste.
Step-by-Step Permanent Christmas Light Installation Process
Alright, so you’re ready to get those permanent Christmas lights up! It might seem like a big job, but breaking it down into steps makes it way more manageable. I’m going to walk you through the process, from getting ready to the final touches.
Preparing the Installation Area
First things first, you gotta get your workspace ready. This means clearing away any obstacles around your house where you’ll be working. Move any patio furniture, potted plants, or anything else that might get in your way. Give the area a good sweep or hose down to get rid of dirt and debris. You don’t want to be tripping over stuff or working in a dirty environment. Also, make sure you have easy access to your power outlets. If you need to use extension cords, make sure they’re heavy-duty and rated for outdoor use. Safety first, always!
Mounting Light Channels or Tracks
Okay, now for the fun part – getting those lights mounted! Most permanent systems use channels or tracks that you attach to your house, and then the lights clip into those. Use a level to make sure the tracks are straight. Nothing looks worse than crooked Christmas lights! Use the appropriate screws or fasteners for your siding type. If you’re not sure what to use, ask someone at the hardware store. They can point you in the right direction. Space the fasteners evenly, according to the manufacturer’s instructions. This will keep the tracks secure and prevent them from sagging over time.
Securing Lights into Place
Once your tracks are up, it’s time to snap those lights in! This is usually pretty straightforward. Just follow the manufacturer’s instructions. Make sure each light is securely fastened in the track. You don’t want any lights falling down in the middle of the night. If your system uses clips, make sure they’re properly attached to each light. Give each light a gentle tug to make sure it’s secure. It’s better to catch a loose light now than to have to fix it later.
Connecting Electrical Wiring Safely
Alright, this is where things get a little more serious. If you’re not comfortable working with electricity, please call a professional. Seriously, it’s not worth risking your safety. If you are comfortable, make sure you turn off the power to the circuit you’ll be working on. Use a circuit tester to double-check that the power is off. Connect the wiring according to the manufacturer’s instructions. Use wire connectors that are rated for outdoor use. Wrap any exposed connections with electrical tape to protect them from the elements. Double-check all your connections before turning the power back on.
Testing the Lighting System
Okay, moment of truth! Turn the power back on and see if your lights work. If everything is connected properly, they should light up. If some of the lights don’t work, double-check your connections. Make sure all the lights are securely fastened in the tracks. If you’re using a smart system, make sure it’s properly connected to your Wi-Fi network. Test all the different colors and patterns to make sure everything is working as it should. This is the time to catch any problems before you’re completely finished.
Concealing Wires for a Clean Look
Now, let’s hide those wires! Nobody wants to see a bunch of wires hanging all over the place. Use cable clips or ties to secure the wires to your house. You can also run the wires inside conduit or tubing to protect them from the elements. Paint the conduit to match your house color so it blends in. Be creative and find ways to hide the wires so they’re not visible. A clean installation will make your lights look much more professional.
Programming Smart Light Features
If you went with a smart lighting system, now’s the time to set it up. Download the app and connect to your lights. Play around with the different colors, patterns, and animations. Set up schedules so your lights turn on and off automatically. Integrate your lights with your smart home system. The possibilities are endless! Take some time to learn all the features of your system. The more you know, the more you’ll be able to customize your lights to your liking.
Final Inspection and Adjustments
Okay, you’re almost done! Take one last walk around your house and inspect your lights. Make sure all the lights are working properly. Adjust any lights that are crooked or out of place. Clean up any debris from the installation. Step back and admire your work! You’ve just installed permanent Christmas lights that will bring joy to your home for years to come. Great job!
Installing permanent Christmas lights is a project that requires careful planning and attention to detail. By following these steps, you can ensure a safe and successful installation that will enhance the beauty of your home for years to come.
Ensuring Safety During Permanent Christmas Light Installation
Prioritizing Ladder Safety Practices
Okay, so you’re up on a ladder, attaching lights. Sounds simple, right? But ladders can be super dangerous if you don’t pay attention. Always make sure the ladder is on a level surface. Check the ladder’s weight limit, and don’t lean too far to one side. Have someone spot you if possible. It’s better to be safe than sorry, especially when you’re dealing with heights.
Understanding Electrical Wiring Basics
Even if you’re not an electrician, knowing a little about wiring is a must. We’re talking about electricity here, so respect it. Never work with live wires. Turn off the power at the breaker before you start messing with anything. Use a voltage tester to double-check that the power is really off. If you’re not sure about something, it’s always best to call a pro. Seriously, don’t risk it.
Using Ground Fault Circuit Interrupters
GFCI outlets are your friend. These outlets are designed to trip and cut off power if they detect a fault, which can save you from a nasty shock. If you’re plugging your lights into an outdoor outlet, make sure it’s a GFCI outlet. If not, you can buy a GFCI adapter to plug in between the outlet and your lights. It’s a small investment that can make a big difference.
Avoiding Overloading Electrical Circuits
Don’t plug too many lights into one circuit. Overloading a circuit can cause it to trip, or worse, start a fire. Check the wattage of your lights and the amperage of your circuit. If you’re getting close to the limit, spread the lights out over multiple circuits. It’s a simple way to prevent a big problem.
Working in Dry Weather Conditions
Water and electricity don’t mix. It’s just a fact. Never install lights in the rain or when things are wet. Wait for a dry day to do your work. If it starts raining while you’re working, stop and wait for it to clear up. It’s not worth risking your safety to get the job done faster.
Wearing Appropriate Protective Gear
Safety glasses, gloves, and sturdy shoes are a must. Safety glasses will protect your eyes from debris, gloves will protect your hands from cuts and scrapes, and sturdy shoes will give you good traction on the ladder. It’s a small investment in gear that can make a big difference in preventing injuries.
Consulting Professional Electricians
If you’re not comfortable working with electricity, or if you have any doubts about what you’re doing, call a pro. A licensed electrician can make sure the job is done safely and correctly. It might cost more upfront, but it can save you from costly mistakes or even serious injuries down the road.
Following Manufacturer Safety Guidelines
Always read the instructions that come with your lights. The manufacturer knows their product best, and they’ll have specific safety guidelines that you should follow. Don’t skip this step. It could save you from making a mistake that could damage your lights or put yourself in danger.
Safety is always the most important thing. Take your time, be careful, and don’t be afraid to ask for help if you need it. Permanent Christmas lights can look great, but they’re not worth risking your health or safety for.
Smart Features for Permanent Christmas Light Installation
App Control and Remote Access
Being able to control your lights from your phone is a game-changer. Most permanent Christmas light systems come with a dedicated app that lets you turn the lights on and off, change colors, and set schedules from anywhere. It’s super handy when you’re away from home and want to make it look like someone’s there, or if you just want to surprise your family with a fun light show.
Customizable Color Palettes
Forget being stuck with just red and green! With smart permanent lights, you can usually pick from a huge range of colors. Some systems even let you create your own custom color palettes to match specific holidays, events, or just your personal style. I like to switch things up depending on my mood.
Dynamic Lighting Patterns
Static lights are boring. The cool thing about smart lights is the ability to create dynamic patterns. Think twinkling, chasing, fading, and more. Some apps have pre-set patterns, while others let you design your own. It’s a fun way to add some extra flair to your home.
Scheduling and Timer Functions
Setting schedules is a must. I don’t want to have to remember to turn my lights on and off every night. With scheduling, you can set your lights to automatically turn on at dusk and off at dawn, or create custom schedules for different days of the week. It’s a great way to save energy and make your life easier.
Integration with Smart Home Systems
If you’re already using a smart home system like Alexa or Google Home, you can probably integrate your permanent Christmas lights. This lets you control your lights with voice commands or include them in your smart home routines. For example, you could say, “Alexa, turn on holiday lights,” and boom, instant festive cheer.
Voice Control Capabilities
Speaking of voice control, it’s super convenient. Instead of fumbling with your phone, you can just tell your smart assistant to change the lights. It’s especially useful when your hands are full or when you’re feeling lazy (which, let’s be honest, is most of the time).
Geofencing for Automated Lighting
Geofencing is a neat feature that uses your phone’s location to automatically control your lights. You can set it up so that your lights turn on when you’re a certain distance from home and turn off when you leave. It’s a great way to save energy and add an extra layer of security.
Energy Monitoring and Optimization
Some smart light systems offer energy monitoring features that let you track how much energy your lights are using. This can help you identify ways to optimize your lighting and save money on your electricity bill. Plus, it’s just interesting to see how much energy different colors and patterns consume.
I’ve found that using smart features with my permanent Christmas lights has made them way more enjoyable and practical. It’s not just about having pretty lights; it’s about having a system that’s easy to use, energy-efficient, and customizable to my needs.
Maintenance for Permanent Christmas Light Installation
Regular Cleaning of Light Fixtures
Okay, so you’ve got your permanent Christmas lights installed, and they look amazing. But just like anything else outside, they’re going to get dirty. Dust, pollen, bird droppings – you name it, it’ll end up on your lights. Regular cleaning is key to keeping them bright and looking their best. I usually try to wipe mine down a couple of times a year. A soft cloth and some mild soap and water do the trick. Don’t go crazy with harsh chemicals, you don’t want to damage anything.
Inspecting Wiring for Damage
Wiring is important. It’s what keeps the lights on! Give your wiring a once-over every now and then. Look for any signs of wear and tear – cracks, frays, or anything that just doesn’t look right. If you spot something, don’t ignore it. It’s better to fix it early before it becomes a bigger problem. I had a squirrel chew through some of my wiring last year, and it was not fun to fix.
Checking for Loose Connections
Loose connections can cause all sorts of problems, from flickering lights to complete outages. Take a few minutes to check all the connections to make sure they’re snug. If you find any loose ones, tighten them up. It’s a simple thing, but it can save you a lot of headaches down the road.
Replacing Malfunctioning Bulbs
Even with LEDs, bulbs can still go bad. If you notice a bulb that’s out or flickering, replace it as soon as possible. It’s a good idea to keep a few spare bulbs on hand so you’re not scrambling when one burns out. Plus, replacing a bulb right away keeps the whole display looking good.
Protecting Lights from Pests
Pests love to mess with outdoor lights. Birds might try to nest in them, squirrels might chew on the wires, and insects might build webs all over them. There are a few things you can do to protect your lights from pests. You can use bird spikes to keep birds from landing on them, and you can wrap the wires in protective sleeves to keep squirrels from chewing on them. I also spray my lights with insect repellent every few months.
Addressing Weather-Related Wear
Weather can be tough on outdoor lights. Sun, rain, wind, and snow can all take their toll. Check your lights regularly for any signs of weather-related wear. Look for cracks, fading, or rust. If you spot anything, take action to fix it before it gets worse. You might need to replace some parts or apply a sealant to protect them from the elements.
Updating Smart System Software
If you have smart lights, don’t forget to keep the software updated. Updates often include bug fixes, new features, and security improvements. Check for updates regularly and install them as soon as they’re available. It’s a small thing that can make a big difference in the performance of your lights.
Scheduling Professional Check-ups
Sometimes, it’s best to leave things to the pros. Consider scheduling a professional check-up for your lights every year or two. A professional can spot problems that you might miss and can perform more complex repairs. It’s an investment that can help extend the life of your lights and keep them looking their best.
I’ve found that a little bit of regular maintenance goes a long way in keeping my permanent Christmas lights looking great year after year. It’s not always fun, but it’s worth it to have a beautiful and reliable lighting display.
Troubleshooting Common Permanent Christmas Light Issues
Diagnosing Power Supply Problems
Okay, so your lights aren’t turning on? First thing to check is the power. Is the outlet actually working? I’ve been there, plugged something in only to realize the outlet was dead. Try a different outlet or test the one you’re using with something else. If it’s an outdoor outlet, make sure it’s weatherproof and not tripped. Extension cords can be a pain too; check for damage or loose connections. Sometimes it’s the simple stuff that gets you.
Resolving Connectivity Issues
If you’ve got smart lights, connectivity can be a real headache. Make sure your Wi-Fi is strong enough where the lights are installed. I had to get a Wi-Fi extender just to reach my backyard lights. Also, check the app – is it up to date? Are the lights still connected to your network? Sometimes you just need to re-sync everything. It’s annoying, but usually fixes the problem. Here’s a quick checklist:
- Check Wi-Fi signal strength.
- Update the light control app.
- Re-sync lights to the network.
Fixing Flickering or Dim Lights
Flickering or dim lights are usually a sign of a loose connection or a bad bulb. Go around and check each connection point. Make sure everything is tight and secure. If that doesn’t work, try replacing the bulb. Even LEDs can go bad eventually. If it’s still flickering after that, you might have a wiring issue, and that’s when it’s time to call a pro.
Addressing Individual Light Failures
One light out of many? That’s usually a bulb issue. Replace it and see if that fixes it. If it’s still not working, check the wiring right around that light. There might be a break or a loose connection. If you’re comfortable with it, you can try to repair the wire, but if not, again, call a professional. It’s better to be safe than sorry.
Troubleshooting App Control Glitches
Apps can be buggy, we all know that. If your app isn’t controlling the lights properly, try closing it and reopening it. If that doesn’t work, try restarting your phone. Still no luck? Uninstall and reinstall the app. It’s a pain, but it often fixes the problem. Also, check for app updates – developers are always releasing fixes.
Identifying Wiring Faults
Wiring faults are tricky and potentially dangerous. If you suspect a wiring problem, like frayed wires or exposed connections, don’t mess around. Turn off the power to the lights and call an electrician. Seriously, electricity is not something to play with. Better to pay a professional than risk getting shocked or starting a fire.
Resetting the Lighting System
Sometimes, the easiest solution is to just reset the whole system. Most smart light systems have a reset button or a reset procedure. Check your manufacturer’s instructions for how to do it. This can clear out any weird settings or glitches and get you back to a clean slate. It’s like rebooting your computer – sometimes it just needs a fresh start.
Contacting Customer Support for Help
If you’ve tried everything and nothing is working, it’s time to call customer support. They might have some specific troubleshooting steps for your particular brand of lights. Plus, if your lights are still under warranty, they might be able to send you replacement parts or even a whole new system. Don’t be afraid to reach out – that’s what they’re there for.
Troubleshooting lighting issues can be frustrating, but with a systematic approach, you can often resolve common problems yourself. Remember to prioritize safety and don’t hesitate to seek professional help when needed.
Cost Considerations for Permanent Christmas Light Installation
Initial Investment Breakdown
Okay, so let’s talk money. The initial cost of permanent Christmas lights can seem like a lot compared to those cheap string lights you grab every year. You’re not just paying for the lights themselves; you’re also paying for things like mounting hardware, wiring, and maybe even professional installation. Breaking down these costs helps you see where your money is going. Expect to pay more upfront, but remember, this is a long-term investment.
Comparing DIY vs. Professional Costs
Doing it yourself can save you some serious cash on labor costs. However, you’ll need to buy all the tools and materials, and you’re responsible for any mistakes. Hiring a pro means you’re paying for their expertise and time, but you’re also getting a warranty and peace of mind. It really depends on your skill level and how much you value your time. If you mess up the electrical, it could cost you more in the long run to fix it.
Long-Term Savings on Energy Bills
LED lights are super energy-efficient compared to older incandescent bulbs. This means you’ll see a noticeable drop in your electricity bill, especially if you like to keep your lights on for extended periods. Over time, these savings can really add up, making permanent LED lights a smart financial choice.
Value Added to Your Property
Believe it or not, permanent Christmas lights can actually increase your home’s value. They add curb appeal and give your home a polished, finished look. Plus, potential buyers will appreciate the convenience and energy savings. It’s a small detail that can make a big difference.
Understanding Warranty Coverage
Before you buy, make sure you understand the warranty. What does it cover? How long does it last? A good warranty can save you a lot of money if something goes wrong. Pay attention to the fine print and don’t be afraid to ask questions.
Potential Repair and Maintenance Costs
Even though they’re “permanent,” these lights still need some TLC. You might need to replace a bulb here and there, or fix a loose connection. Factor in these potential costs when you’re budgeting. Regular cleaning and inspections can help minimize these expenses.
Financing Options for Installation
If the initial cost is too much, look into financing options. Some installers offer payment plans, or you could use a credit card or home equity loan. Just make sure you understand the interest rates and terms before you sign anything.
Return on Investment Analysis
Okay, let’s get nerdy for a second. To figure out if permanent Christmas lights are really worth it, do a return on investment (ROI) analysis. Add up all the costs (lights, installation, maintenance) and compare them to the savings (energy bills, replacement costs for traditional lights, time saved). If the savings outweigh the costs over a few years, then it’s a good investment.
Think of it this way: you’re trading a big upfront cost for long-term convenience and savings. It’s like buying a really good appliance – it costs more at first, but it lasts longer and saves you money in the end.
Choosing a Professional for Permanent Christmas Light Installation
Benefits of Professional Installation
Okay, so you’re thinking about getting permanent Christmas lights installed. You could do it yourself, but let’s be real, sometimes it’s just better to call in the pros. The biggest benefit is peace of mind. You know the job will be done right, and you won’t have to worry about messing something up or, worse, hurting yourself. Plus, they usually have better equipment and more experience, which means a cleaner, faster install.
Qualities of a Reputable Installer
Finding a good installer is key. You want someone who knows their stuff and isn’t going to cut corners. Look for these things:
- Experience: How long have they been doing this?
- Reputation: What do other customers say?
- Communication: Are they easy to talk to and do they answer your questions clearly?
- Attention to Detail: Do they seem like they care about doing a good job?
Checking for Licenses and Insurance
This is super important. You want to make sure the installer is licensed to do electrical work in your area. This shows they’ve met certain standards and know what they’re doing. Also, check that they have insurance. If something goes wrong during the install, you don’t want to be on the hook for it.
Reviewing Customer Testimonials
Before you hire anyone, read what other people have to say about them. Check online review sites, ask for references, and see if you can find any before-and-after photos of their work. This will give you a good idea of what to expect.
Obtaining Multiple Quotes
Don’t just go with the first installer you find. Get quotes from at least three different companies. This will help you compare prices and services and make sure you’re getting a fair deal. Make sure each quote includes the same scope of work so you can compare apples to apples.
Understanding Service Agreements
Before you sign anything, read the service agreement carefully. Make sure you understand what’s included in the price, what’s not, and what happens if something goes wrong. Pay attention to the fine print and don’t be afraid to ask questions.
Discussing Warranty and Support
Find out what kind of warranty the installer offers on their work and the lights themselves. What happens if a light goes out or something breaks down? Will they come back and fix it for free? Make sure you’re clear on the terms of the warranty before you commit.
Ensuring Timely Project Completion
Talk to the installer about their timeline for the project. How long will it take to install the lights? What factors could delay the project? Make sure you’re comfortable with their schedule and that they’re committed to finishing the job on time.
Hiring a professional might cost more upfront, but it can save you a lot of headaches in the long run. You’re paying for their expertise, experience, and peace of mind. Plus, a good installer will make sure your lights look amazing and last for years to come.
DIY Permanent Christmas Light Installation Guide
Assessing Your DIY Skill Level
Before you even think about climbing up on that ladder with a drill, be honest with yourself. Are you comfortable working with electricity? Have you ever installed anything more complicated than a picture frame? Permanent Christmas lights aren’t like stringing up a few bulbs on a tree; it’s a project that requires some know-how. If you’re not confident, it’s okay to admit it! Seriously, your safety (and your house) is worth more than saving a few bucks. Maybe start with a smaller project first, or consider getting some help from a friend who knows their way around tools.
Gathering All Required Materials
Okay, so you’ve decided to go for it. Now comes the fun part: shopping! But don’t just run to the store and grab the first string of lights you see. You need to make a list, and check it twice (sorry, couldn’t resist). Here’s a basic rundown of what you’ll need:
- Permanent Christmas lights (duh!). Make sure they’re rated for outdoor use and are the right length for your house.
- Mounting clips or tracks. These will hold the lights in place.
- A drill and appropriate drill bits.
- Screws or other fasteners.
- Wire strippers and crimpers.
- Electrical tape.
- Outdoor-rated extension cords (if needed).
- A ladder (a sturdy one!).
- Safety glasses and gloves.
Don’t skimp on quality here. Cheap materials will only cause you headaches down the road.
Following Detailed Instructions
This is where things can get tricky. Every set of lights is different, so read the instructions carefully. I know, I know, nobody likes reading instructions, but trust me on this one. Pay attention to things like spacing, wiring, and mounting techniques. If the instructions are unclear, look for videos online or contact the manufacturer for help. Don’t just wing it – you’ll regret it later.
Utilizing Online Resources and Tutorials
YouTube is your friend! There are tons of videos out there showing how to install permanent Christmas lights. Watch a few different ones to get a good understanding of the process. Pay attention to the comments section, too – you might find helpful tips or warnings from other DIYers. Just remember to take everything with a grain of salt and double-check the information before you try it yourself.
Seeking Advice from Experienced DIYers
Got a friend or neighbor who’s handy? Ask them for advice! They might have some tips or tricks that you wouldn’t find anywhere else. Plus, it’s always good to have someone to bounce ideas off of. Just make sure they actually know what they’re doing – you don’t want to take advice from someone who’s just as clueless as you are.
Allowing Ample Time for the Project
Don’t try to rush this! Installing permanent Christmas lights is a time-consuming project. Set aside a full weekend (or even longer) to get it done right. Trying to cram it in after work or on a busy Saturday is a recipe for disaster. You’ll end up making mistakes, cutting corners, and generally being miserable. Take your time, be patient, and enjoy the process (as much as possible, anyway).
Prioritizing Personal Safety
This is the most important thing! Working with electricity and heights can be dangerous. Always turn off the power before working with any wires. Use a sturdy ladder and have someone spot you. Wear safety glasses and gloves. And if you’re not comfortable with any part of the process, don’t do it! It’s better to be safe than sorry.
Knowing When to Call a Professional
Okay, so you’ve started the project and realized you’re in over your head. Don’t panic! It’s okay to admit defeat and call a professional. There’s no shame in getting help, especially when it comes to something as important as electrical work. A professional installer will have the experience and expertise to get the job done safely and correctly. Plus, they’ll probably offer a warranty on their work, which is always a good thing.
Look, sometimes DIY just isn’t the answer. If you’re feeling overwhelmed, stressed, or just plain scared, it’s time to call in the pros. Your safety and peace of mind are worth the investment.
Integrating Permanent Christmas Lights with Home Design
Highlighting Architectural Features
Permanent Christmas lights aren’t just for the holidays; they can really bring out the best in your home’s design all year round. Think about using them to emphasize interesting angles, rooflines, or even columns. It’s a subtle way to add character and charm.
Creating Ambient Outdoor Lighting
Beyond just highlighting features, consider using these lights to create a warm and inviting atmosphere. Soft, diffused lighting can make your patio or deck feel like an extension of your living space. It’s all about creating a mood.
Enhancing Landscape Elements
Don’t forget about your yard! Use permanent lights to showcase trees, shrubs, or even water features. Uplighting trees can create a dramatic effect, while gently illuminating pathways adds both beauty and safety.
Coordinating with Existing Exterior Decor
Make sure your new lights complement your home’s existing style. If you have a modern home, sleek, minimalist lighting might be the way to go. For a more traditional look, consider warmer tones and classic designs. It’s about creating a cohesive look.
Choosing Discreet Light Placement
Sometimes, less is more. Consider hiding the light fixtures themselves to create a more subtle effect. This can be achieved by mounting lights under eaves or behind architectural details. The goal is to see the light, not the source.
Adapting Lights for Seasonal Themes
One of the best things about permanent lights is their versatility. With smart controls, you can easily change colors and patterns to match different seasons or holidays. Red and green for Christmas, orange and purple for Halloween – the possibilities are endless.
Balancing Brightness and Aesthetics
It’s important to find the right balance between brightness and aesthetics. You don’t want your lights to be so bright that they’re distracting or annoying to neighbors. Instead, aim for a soft, inviting glow that enhances your home’s beauty without being overwhelming.
Designing for Year-Round Appeal
Remember, these lights are permanent, so you’ll want to choose a design that looks good all year round. Consider neutral colors and classic patterns that won’t go out of style. This way, your home will always look its best, no matter the season.
I think the best way to approach permanent lighting is to think of it as an investment in your home’s overall aesthetic. It’s not just about Christmas; it’s about creating a beautiful and inviting space that you can enjoy every day of the year. It’s about making your house feel like a home, inside and out.
Advanced Techniques for Permanent Christmas Light Installation
Okay, so you’ve got the basics down for permanent Christmas lights. Now, let’s get into some cooler stuff. We’re talking about taking your lighting game to the next level. It’s not just about stringing up some lights; it’s about creating something truly impressive and unique.
Zoning for Different Lighting Effects
Think of your house like a stage. You wouldn’t light the whole thing the same way, right? Zoning lets you control different sections of your lights independently. This means you can have different colors, patterns, or brightness levels in various areas. For example, maybe you want a soft, warm white on the porch but a vibrant, colorful display along the roofline. Zoning makes it possible. You can achieve this by:
- Using multiple controllers, each managing a specific zone.
- Splitting your lights into distinct circuits.
- Programming your smart system to recognize and control these zones.
Implementing Advanced Control Systems
Forget simple on/off switches. We’re talking about serious control here. Advanced systems give you granular control over every single light, or at least every zone. This opens up a world of possibilities for creating complex and dynamic lighting displays. Think about:
- DMX controllers, often used in professional lighting setups.
- Custom-built software interfaces for total control.
- Integration with weather data to automatically adjust lighting based on conditions.
Integrating with Home Automation
Why stop at just lights? Integrate your permanent Christmas lights with your entire smart home setup. Imagine your lights automatically dimming when you start a movie, or changing color when your favorite sports team scores. It’s all possible with home automation. You can use platforms like:
- IFTTT (If This Then That) to create custom triggers.
- SmartThings or Home Assistant for centralized control.
- Voice assistants like Alexa or Google Assistant to control your lights with simple commands.
Utilizing Motion Sensors for Lighting
Want to add a layer of security and energy savings? Use motion sensors to trigger your lights. This is great for:
- Lighting up pathways when someone approaches your house.
- Creating a deterrent for potential intruders.
- Automatically turning off lights in areas that aren’t in use.
Creating Custom Light Sequences
Don’t settle for pre-programmed patterns. Design your own! Most advanced systems let you create custom light sequences, so you can make your lights dance to your favorite music, or create unique holiday displays. This often involves:
- Using software to map out the timing and colors of each light.
- Experimenting with different patterns and transitions.
- Saving your sequences for easy access and reuse.
Exploring DMX Control for Complex Displays
If you’re serious about lighting, DMX is the way to go. It’s a standard protocol used in professional lighting for concerts, theater, and more. It gives you unparalleled control over individual lights, allowing you to create incredibly complex and dynamic displays. It can be a bit complicated, but the results are worth it. DMX involves:
- Understanding DMX addressing and channels.
- Using specialized DMX controllers and software.
- Learning how to program complex lighting cues.
Incorporating Sound Synchronization
Take your light show to the next level by synchronizing it with music. Imagine your lights pulsing and changing color in perfect time with your favorite songs. It’s a showstopper! You’ll need:
- Software that can analyze audio and generate lighting cues.
- A controller that can translate those cues into DMX signals.
- A good sound system to complete the experience.
Designing for Future Expansion
Think ahead! When you’re installing your permanent lights, plan for future expansion. This might mean:
- Leaving extra wiring in place for additional lights.
- Choosing a control system that can handle more zones or lights.
- Documenting your setup so you can easily add to it later.
By thinking about these advanced techniques, you can create a truly stunning and unique lighting display that will impress your neighbors and bring joy to your home for years to come. It might take a little extra effort, but the results are well worth it.
Environmental Impact of Permanent Christmas Light Installation
Reduced Energy Consumption with LEDs
Okay, so, LEDs are a big deal when we’re talking about saving energy. Permanent Christmas lights that use LEDs consume significantly less power than those old-school incandescent bulbs. It’s not even close. This means lower electricity bills and a smaller carbon footprint. Think about it: leaving your lights on longer during the holidays (or year-round!) doesn’t feel as bad when you know you’re not sucking up tons of energy.
Lower Carbon Footprint Benefits
Because LEDs use less energy, it follows that they help reduce your carbon footprint. Power plants, especially those that burn fossil fuels, contribute a lot to air pollution. By using less electricity, you’re indirectly helping to reduce the amount of pollution released into the atmosphere. It’s a small thing, but if everyone switched to LEDs, it would add up to a pretty big impact.
Minimizing Waste from Disposable Lights
How many times have you thrown out a string of Christmas lights because half the bulbs were dead? Traditional lights are notorious for failing quickly, leading to a lot of waste. Permanent lights, especially good quality ones, are designed to last much longer. This means fewer lights ending up in landfills. Plus, you’re not buying new sets every year, which saves resources.
Durability Reduces Replacement Needs
Durability is key here. Permanent lights are built to withstand the elements – rain, snow, sun, you name it. This means they don’t need to be replaced as often as those flimsy temporary lights. Less frequent replacements translate directly into less waste and fewer resources used to manufacture new lights.
Sustainable Manufacturing Practices
This one’s a bit trickier because it depends on the manufacturer. Ideally, you want to choose lights from companies that prioritize sustainable manufacturing practices. This could mean using recycled materials, reducing waste during production, and ensuring fair labor practices. It’s worth doing a little research to find brands that align with your values.
Recycling Old Lighting Components
When your old lights finally do give out, don’t just toss them in the trash! Many components can be recycled. Check with your local recycling center to see if they accept electronic waste or specific types of lighting. Some manufacturers even have take-back programs where you can send your old lights back to be recycled properly.
Promoting Energy-Efficient Homes
Installing permanent LED Christmas lights is one way to make your home more energy-efficient. It shows you’re committed to reducing your environmental impact. Plus, it can inspire others to do the same. Small changes like this can contribute to a larger movement towards sustainability.
Long-Term Ecological Advantages
In the long run, switching to permanent LED Christmas lights offers several ecological advantages. Reduced energy consumption, less waste, and a smaller carbon footprint all contribute to a healthier planet. It’s a simple change that can make a real difference over time.
Switching to permanent Christmas lights is a step towards a more sustainable lifestyle. It’s about making conscious choices that benefit both your wallet and the environment. By choosing durable, energy-efficient options, you’re investing in a brighter future for everyone.
Legal and Regulatory Aspects of Permanent Christmas Light Installation
Understanding Local Building Codes
Before you even think about climbing a ladder, it’s smart to check your local building codes. These codes dictate what’s allowed in terms of outdoor lighting, and they can vary quite a bit from town to town. Some areas have restrictions on brightness, hours of operation, or even the type of fixtures you can use. Ignoring these rules could lead to fines or having to remove your lights, so it’s worth doing your homework upfront. You can usually find this information on your city or county’s website, or by calling the local building department. It might seem like a pain, but it’s better than dealing with code enforcement later.
Checking Homeowners Association Rules
If you live in a neighborhood with a Homeowners Association (HOA), you’ve got another layer of rules to consider. HOAs often have very specific guidelines about what you can and can’t do with the exterior of your home, and that includes permanent lighting. They might have rules about the color of the lights, how they’re mounted, or even whether you’re allowed to have them at all. Make sure to read through your HOA’s covenants and restrictions before you start planning your installation. It’s also a good idea to submit your plans to the HOA for approval before you begin any work. This can save you a lot of headaches down the road.
Obtaining Necessary Permits
Depending on where you live and the scope of your project, you might need to get a permit before installing permanent Christmas lights. This is especially true if you’re doing any electrical work that requires changes to your home’s wiring. Check with your local building department to see if a permit is required. The process usually involves submitting your plans for review and paying a fee. While it might seem like an extra step, getting a permit ensures that your installation meets safety standards and complies with local regulations. Plus, it can protect you from liability if something goes wrong.
Adhering to Electrical Safety Standards
Electrical safety is no joke, especially when you’re dealing with outdoor lighting. Make sure your installation complies with all applicable electrical codes and standards. This includes using the right type of wiring, properly grounding your lights, and protecting your circuits with ground fault circuit interrupters (GFCIs). If you’re not comfortable working with electricity, it’s best to hire a qualified electrician to do the job. They’ll know how to ensure that your installation is safe and up to code. Messing with electricity without the proper knowledge can be dangerous, so don’t take any chances.
Considering Neighboring Property Impacts
While you have the right to decorate your home, it’s important to be considerate of your neighbors. Bright or flashing lights can be annoying or even disruptive, especially if they shine directly into your neighbor’s windows. Think about the placement of your lights and how they might affect the people living around you. It’s always a good idea to talk to your neighbors about your plans before you start installing your lights. This can help you avoid any potential conflicts and maintain good relationships.
Ensuring Compliance with Zoning Laws
Zoning laws regulate how land can be used and what types of structures are allowed in different areas. These laws can affect your permanent Christmas light installation, especially if you’re planning to use your lights for commercial purposes or if you live in a historic district. Check with your local zoning department to make sure your plans comply with all applicable regulations. Ignoring zoning laws can result in fines or legal action, so it’s important to do your research.
Liability and Insurance Considerations
Installing permanent Christmas lights can increase your liability, especially if someone gets injured as a result of your installation. For example, if a light fixture falls and hits someone, you could be held responsible. Make sure your homeowner’s insurance policy covers any potential liabilities related to your lighting. It’s also a good idea to talk to your insurance agent about your plans and make sure you have adequate coverage. Taking these precautions can protect you from financial losses in the event of an accident.
Navigating Property Line Regulations
Be mindful of property lines when installing your lights. You generally can’t install anything that extends onto your neighbor’s property without their permission. This includes light fixtures, wiring, or even the light itself. If you’re unsure about the location of your property line, you can hire a surveyor to mark it for you. Trespassing on your neighbor’s property can lead to legal disputes, so it’s important to stay within your boundaries.
It’s easy to get caught up in the excitement of planning your permanent Christmas lights, but don’t forget about the legal and regulatory aspects. Taking the time to understand and comply with these rules can save you a lot of trouble in the long run. From building codes to HOA rules to electrical safety standards, there are a lot of things to consider. But with a little research and planning, you can ensure that your installation is safe, legal, and enjoyable for everyone.
Maximizing the Lifespan of Your Permanent Christmas Lights
Regular Cleaning and Inspection
Keeping your permanent Christmas lights clean is super important. Dust, dirt, and grime can build up over time, dimming the lights and potentially causing them to overheat. I usually give mine a good cleaning a couple of times a year. Just wipe them down with a soft, damp cloth. Also, take a close look at the wiring and connections while you’re cleaning. Look for any signs of damage or wear. Catching small problems early can prevent bigger headaches later.
Protecting from Extreme Weather
Permanent lights are made to withstand the elements, but extreme weather can still take a toll. If you live in an area with harsh winters or intense summers, consider taking extra precautions. For example, if you know a big storm is coming, you might want to temporarily unplug your lights to protect them from power surges. Also, make sure the lights are securely mounted so they don’t get damaged by strong winds.
Addressing Minor Issues Promptly
Don’t ignore small problems! If you notice a light flickering, dimming, or not working at all, address it right away. Sometimes it’s just a loose connection or a bulb that needs replacing. But if you let these issues linger, they can lead to more serious problems down the road. I had one light that was flickering for weeks before I finally got around to fixing it, and by then, it had damaged the entire string.
Using Surge Protectors
Power surges can fry your lights in an instant. A good surge protector is a must-have, especially if you live in an area with frequent lightning storms. Plug your lights into a surge protector to shield them from voltage spikes. It’s a small investment that can save you a lot of money in the long run.
Properly Sealing Connections
Moisture is the enemy of electrical components. Make sure all connections are properly sealed to prevent water from getting in. Use weatherproof connectors and sealant to protect any exposed wires. I learned this the hard way when water got into one of my connections and caused a short circuit. Now I’m extra careful about sealing everything up tight.
Avoiding Physical Damage
This might seem obvious, but it’s worth mentioning. Be careful not to accidentally damage your lights when you’re doing yard work or other outdoor activities. Avoid hitting them with the lawnmower, trimmer, or anything else that could cause damage. I once accidentally clipped a wire with my hedge trimmer, and it was a pain to fix.
Storing Control Units Safely
If your lights have a control unit, make sure to store it in a safe, dry place. These units are often more sensitive to the elements than the lights themselves. I keep mine in a weatherproof box to protect it from rain and snow. Also, avoid exposing the control unit to extreme temperatures, as this can damage the internal components.
Following Manufacturer Care Instructions
Always read and follow the manufacturer’s care instructions. They know their products best and can provide valuable tips for keeping your lights in good condition. The instructions might include specific cleaning methods, maintenance schedules, or troubleshooting tips. Ignoring these instructions could void your warranty or shorten the lifespan of your lights.
Taking care of your permanent Christmas lights doesn’t have to be a chore. A little bit of regular maintenance can go a long way in extending their lifespan and keeping them looking great for years to come. It’s worth the effort to protect your investment and enjoy your lights for many seasons.
Future Trends in Permanent Christmas Light Installation
Advancements in Smart Lighting Technology
Smart lighting is getting smarter, no surprise there. We’re talking about more than just changing colors with an app. Expect to see lights that learn your preferences, adjust brightness based on the time of day, and even react to music in a more sophisticated way. It’s all about creating the perfect ambiance, effortlessly.
Increased Integration with AI
Imagine your lights knowing when you’re coming home and turning on automatically, or adjusting their color based on the weather forecast. AI integration is going to take permanent lighting to a whole new level. It’s not just about convenience; it’s about creating a truly personalized lighting experience. I think it’s going to be pretty cool.
Development of More Durable Materials
No one wants to replace their permanent lights every few years. That’s why manufacturers are constantly working on developing more durable materials that can withstand even the harshest weather conditions. Think stronger plastics, better waterproofing, and UV-resistant coatings. The goal is to make these lights truly permanent.
Enhanced Energy Efficiency Innovations
LEDs are already pretty energy-efficient, but there’s always room for improvement. Expect to see new innovations that further reduce energy consumption, like adaptive brightness controls and smart scheduling features. It’s all about saving money and reducing your carbon footprint.
Personalized Lighting Experiences
Forget generic lighting schemes. The future is all about personalization. We’re talking about lights that can be customized to match your exact preferences, from color temperature to brightness levels. And with AI integration, your lights will learn your preferences over time and adjust automatically.
Growth of Sustainable Lighting Solutions
As people become more aware of the environmental impact of their choices, there’s a growing demand for sustainable lighting solutions. This means using recycled materials, reducing energy consumption, and minimizing waste. Expect to see more eco-friendly permanent lighting options in the years to come.
Modular and Expandable Systems
Imagine being able to easily add or remove lights as needed, without having to rewire your entire system. That’s the idea behind modular and expandable systems. These systems will allow you to customize your lighting setup to fit your changing needs and preferences. It’s all about flexibility and scalability.
User-Friendly Installation Methods
Let’s face it, installing permanent lights can be a pain. That’s why manufacturers are working on developing more user-friendly installation methods. Think easier mounting systems, simpler wiring connections, and intuitive software interfaces. The goal is to make it easier for anyone to install their own permanent lights, even if they’re not an electrician.
Permanent lighting is becoming more than just a string of lights; it’s evolving into an integrated part of our homes. The focus is shifting towards creating systems that are not only beautiful and functional but also sustainable, personalized, and easy to use. It’s an exciting time for home lighting, and I can’t wait to see what the future holds.
Wrapping It Up
So, there you have it. Putting in permanent Christmas lights might seem like a big job at first, but it’s totally worth it. Think about it: no more wrestling with tangled strings or climbing wobbly ladders every year. You just set them up once, and you’re good to go. Plus, with all the cool tech out there, you can change colors and patterns with just a tap on your phone. It’s pretty neat. These lights aren’t just for the holidays either; they can make your house look great all year round. So, if you’re tired of the yearly light struggle, permanent lights are a smart move. They save you time, effort, and honestly, they just look good.
Frequently Asked Questions
What are permanent Christmas lights?
Permanent Christmas lights are special lights that stay on your house all year. Unlike regular holiday lights you put up and take down, these are built to last and handle all kinds of weather. They save you time and effort because you don’t have to hang them every year.
How are permanent Christmas lights attached?
These lights are secured to your house using special tracks or clips. You usually drill small holes into the eaves or gutters, then snap the lights into place. This keeps them neat and secure, even in strong winds or heavy rain.
Can I change the colors of permanent lights?
Yes, you can! Many permanent light systems let you change the colors and patterns using a phone app or remote control. This means you can have festive red and green for Christmas, spooky orange for Halloween, or soft white for everyday use.
How much do permanent Christmas lights cost?
The cost can change a lot depending on how many lights you need, what kind of lights you pick, and if you install them yourself or hire someone. While they might cost more upfront than cheap temporary lights, they save you money over time because you don’t buy new ones every year or pay for yearly installation.
Do permanent lights use a lot of electricity?
Most permanent Christmas lights use LED technology, which uses much less electricity than old-fashioned bulbs. This means your energy bills won’t go through the roof, even if you keep them on for many hours.
How do permanent lights handle bad weather?
They are built to be tough! Good quality permanent lights are made to stand up to rain, snow, strong winds, and even very hot or cold temperatures. They’re designed to stay looking good for years.
Do permanent lights have smart features?
Yes, many systems come with smart features. You can control them with an app on your phone, set timers for when they turn on and off, and even link them to other smart home devices like voice assistants.
Can I install permanent Christmas lights myself?
While some handy people can install them, it’s often best to hire a professional. They know how to do it safely, make sure the wiring is correct, and get the best look for your home. This also saves you from climbing ladders and dealing with electrical work.
Are permanent lights only for Christmas?
Permanent lights are great for more than just Christmas! You can use them to light up your house for other holidays like Halloween or Valentine’s Day, or just to add nice accent lighting to your home all year round.
How long do permanent Christmas lights usually last?
They are designed to last a long time, often 10-20 years or even more, especially if they are LED lights. This is much longer than temporary lights, which often only last a few seasons.
What kind of upkeep do permanent lights need?
To keep them in good shape, you should clean them gently once in a while and check for any loose wires or damaged parts. Most systems don’t need a lot of constant care, but a quick check now and then helps.
Do permanent lights add value to my home?
Yes, because they are a permanent upgrade to your home, they can make your house look nicer and more modern. This can add to your home’s value, especially since they offer both beauty and convenience.